It's not the actual 75th anniversary of the start of the New House Blog, but it is the 75th Episode, so the title is not completely inappropriate. In this Episode we once again visit the Parents' House, we install some more pavers, and we discover a few ancient artifacts. There will also be a Feline Interlude.
Kitchen Faucet Replacement
We at the New House Blog received a call (or maybe it was a text) asking for help with the kitchen faucet at the Parents' House. Said text (or was it a phone call after all?) came from my parents, and they mentioned that their kitchen faucet had been leaking for a while and they asked for our help in repairing it. We were happy to help out, and as we happened to have a spare brand-new-in-the-box kitchen sink faucet lying around (doesn't everyone?) we figured it would be quicker and more effective to just replace the entire faucet and not worry about repairing the old one. Becky was not available for this job, so I headed over to the Parents' House with my tools and know-how. This repair was pretty straightforward, requiring only a quick trip to Home Depot for a new cold water inlet hose and inlet valve.
This first photo is, of course, the old kitchen faucet in all its leaky glory.
It was leaking from multiple parts. It's a Delta, and I would have expected it to last longer than 17 years.
The Parents House came with the funky inlet valve you see on the right - it and the hose are a single unit. You may remember seeing such a valve in this Episode, and as I did when we replaced the dishwasher in the Parents' House I replaced it with a Sharkbite brand PVC-to-threaded connector. To this new connector was connected a new threaded inlet hose.
This is what the undersink hoses look like after the faucet installation was complete. Note the handy battery-powered work lights.
This is the new faucet in its leak-free glory. It is an upgrade from the old, leaky faucet, and not just because it doesn't leak. This new faucet has one of those nifty pull-out spray nozzles that are all the rage today. It's a Glacier Bay Brand, and you should be able to find one at your local Home Depot.
Feline Interlude
Now it is time for a Feline Interlude.
Satchmo is chilling out in the back yard during one if his too-infrequent (to his mind) visits outside.
And Edgar is chilling out in in the reefer.
Edgar again - this time in the freezer.
More Pavers
We laid down some more pavers recently, but not for the purpose of creating more walkways. These pavers were partially buried in the ground, to act as a border and retaining wall - similar to what we did in this Episode. These new pavers were installed at the edge of our front yard by the sidewalk. We were not completely happy with the way dirt, debris, and plants seemed to spill out onto our sidewalk, and we wanted to clean up the area and prevent dirt and weeds from cluttering it up again. But we didn't want a huge retaining wall, and we didn't want to pay someone to grade our front yard, so we came up with our own solution - a low row of pavers to hold dirt in and keep the sidewalk clear.
This is the start of the project - digging in the dirt. Notice how the plants and weeds all spill over onto the sidewalk.
The first pavers are laid.
At the end of the run, on the border of our neighbor's yard, we encountered this buried concrete obstacle. It appears to be some sort of post foundation - more on this artifact later.
This is what our beautiful new brick border looks like after completion.
This is the same brick work as seen from the other end. Note the lack of dirt and plant material spilling onto the sidewalk.
There was one casualty on this job - a favourite hand spade of mine broke.
Back Yard Archaeology Update
All of the following artifacts were uncovered in the front yard while excavating for the laying of pavers, but we at the New House Blog have been including all pre-Bishopian artifacts under the umbrella of Back Yard Archaeology. The first two artifacts can be seen together in the photo below.
We see a lenght of PVC pipe - possibly part of an ancient sprinkler systerm - and a tube of some kind of chemical. It might not be clear in the photo, so I will tell you what is written on the tube. The first line reads, " Royal Creations Inc." The second line reads, "THE INNOVATORS IN READY TO ASSEMBLE FURNITURE." (Yes, it is in all-caps on the tube.) At this time we do not have any further information on who or what Royal Creations Inc. is or was. Our best guess is that it is/was a furniture manufacturing company of some sort. Why this tube was buried in our front yard is another mystery in the ongoing research into the pre-Bishopian culture.
Artifact number three was mentioned above. It appears to be a post foundation of some sort, but the hole in the center is not a true square. We don't know what this concrete post foundation was intended to hold, and it's the only one we have found in the front yard so far. Due to its depth and construction type this may be an artifact from the Old Ones, those who pre-date the pre-Bishopians. If so, this would be the third Old Ones artifact found to date. All three of the Old Ones artifacts have been one-offs - that is, each has been found alone and not in the company of any other post foundations. It's almost as if they were placed at random to hold up random posts. Where will we find the next one? How many more are out there to be discovered?
This one was a battle to unearth. It was deep, stubborn, and I didn't want to dig into the neighbor's yard to unearth it. I use Sledge to loosen it up and break it up a bit, and what you see in this photo is the artifact reassembled.
The artifact from another angle. It might not be clear in this photo, but the hole in the center is not actually square.
This is the artifact in pieces.
Concluding Flower
And now for the concluding flower.
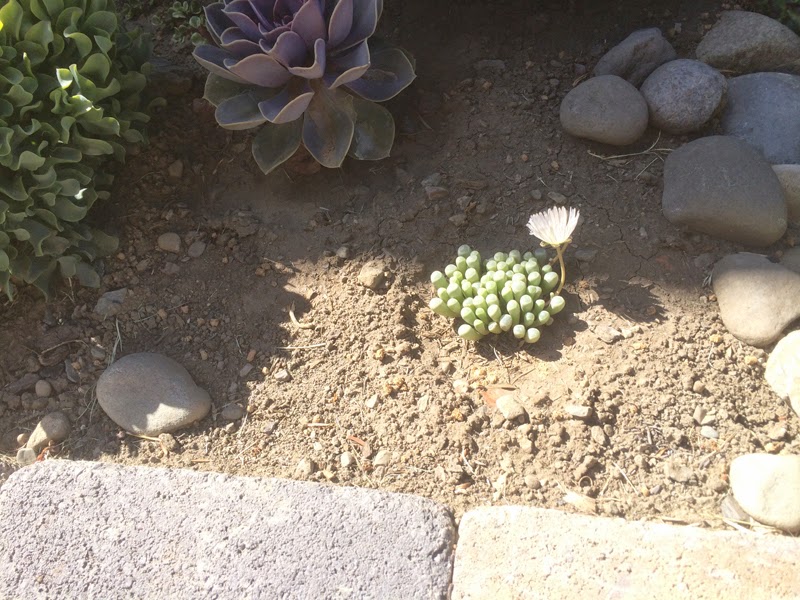
One of our baby toes was in bloom recently. We didn't even know they had the ability to bloom, but there it is. The other baby toes has not bloomed yet.
Happy 75th Episode, everyone!
bIsh
Through the years I've been called many things - Red, Moses, Doctor, Professor, Bish, Hey You - and Bish seems to be the name that stuck. It's short, simple, and easy to spell. This is my blog. It tells a little bit about my life. I hope to update it every now and then, and we'll see what happens.
Sunday, August 31, 2014
Tuesday, July 29, 2014
New House Blog: Episode LXXIIII - Phase Two
Phase Two is complete. And Phase Two is also complete. Or, to put it another way, we have recently completed the second phases of two different projects. One of them is, of course, our grand winter-spring-summer project, and the other is an unnamed but important project. In this Episode we will discuss both of these projects, provide an update to Project G.R.O.S.S.S., showcase an unexpected artifact found in an unexpected place, and more.
Phase Two, The First
Many months ago, almost a year ago, in fact, we replaced some round stone things near our driveway with some flat stones - as seen in this Episode from August 18, 2013. Here are the before and after pictures.
Though this was a vast improvement over the original round stone things, it wasn't quite enough: it was a good start, but it needed more - more stones. Thus Phase Two.
This picture shows the state of the stones after almost one year in-place.
This picture shows the Phase Two expansion. There is not currently a plan for a Phase Three.
Project G.R.O.S.S.S. Update
You may remember our anti-squirrel initiative, Project G.R.O.S.S.S., from the previous Episode. I am saddened to report that our anti-squirrel measures have so far proven to be completely innefective. The very first day after we put up our alleged squirrel deterrents (the shiny spinners and the squirrel repellent) we saw one particularly slimy squirrel trouncing atop the fence with one of our pears in his mouth. In the days following we noticed more pears on the ground and fewer on the trees. At the time of this Episode the slimy squirrels are no longer stealing our pears, but that is only because they have already stolen all of the pears from our pear tree! From our bountiful crop we have consumed exactly ONE pear ourselves - the slimy squirrels got a few hundred. Here's hoping for another bumper crop next year, and more effective anti squirrel methods.
Phase Two, The Second
Our grand winter-spring-summer project is finished! You saw the completed Phase One, and now you will see the completed Phase Two. But first a quick review of our construction methods. Step 1 - dig out the trench. Step 2 - lay down some paver base. Step 3 - lay down some sand. Step 4 - lay down the pavers. Step 5 - apply the polymeric sand.
Step 1 - the trench has been dug. Notice how green the grass is and how small the raspberry bushs are. All the trenches for Phase One and Phase Two were dug at the same time.
Steps 2, 3, 4 - you can see some of the paver base, and the sand and pavers are partially laid. Paver base used for Phase Two - 48 bags. Sand used - 24.5 bags.
Step 5 - the polymeric sand has been applied. We're done with the project. Hooray! Note how dry the grass is and how much bigger the raspberry bushes are. Polymeric sand used - 1 bag.
Phase Two as seen from the yard.
As seen from the balcony.
This shows how all of the paver paths fit together in the back yard.
Our material staging area is mostly empty. We have leftover one bag of paver base and two and a half bags of polymeric sand. The polymeric sand spread a lot farther than our expected.
Turtle Update
We now bring you a turtle update. We have a new turtle planter in our pottery garden, and it is currently growing lettuce.
Unexpected Artifact
We close this Episode with a Back Yard Archaeology update. While churning the contents of the 'Mposter recently we discovered a mysterious unexpected artifact. We put up the 'Mposter, so there should be no pre-Bishopian artifacts inside, and it turns out that this is not a pre-Bishopian artifact.
But what is it, and how did it end up in the 'Mposter? After some serious study and prolonged research we know exactly what this mysterious artifact is, and we have a good idea of how it turned up in the 'Mposter.
Do you remember Clippy, our brand new Fiskars grass clipper from this Episode? Well, Clippy had been mysteriously missing for a few months, and we have already bought a replacement grass clipper because we gave up on finding Clippy. This artifact is Clippy! Clippy has been slowly composting for a few months - possibly since March, 2014! This was truly unexpected.
What likely happened is that when I was clipping some grass in the back yard, and putting the clippings in my green multipurpose tub, I may have absentmindedly tossed clippy into the tub along with the grass clippings. And when I emptied the tub into the 'Mposter there went Clippy. I have churned the 'Mposter several times since, but Clippy never showed up until just a few days ago.
As you can see, Clippy has degraded a bit, but at this point we don't believe Clippy is beyond rehabilitation. A little filing, a little sandpapering, some lubricating - Clippy might still have many useful years of usefulness.
Clip clip here, clip clip there...
bIsh
Phase Two, The First
Many months ago, almost a year ago, in fact, we replaced some round stone things near our driveway with some flat stones - as seen in this Episode from August 18, 2013. Here are the before and after pictures.
![]() |
| Before |
![]() |
| After |
Though this was a vast improvement over the original round stone things, it wasn't quite enough: it was a good start, but it needed more - more stones. Thus Phase Two.
This picture shows the state of the stones after almost one year in-place.
This picture shows the Phase Two expansion. There is not currently a plan for a Phase Three.
Project G.R.O.S.S.S. Update
You may remember our anti-squirrel initiative, Project G.R.O.S.S.S., from the previous Episode. I am saddened to report that our anti-squirrel measures have so far proven to be completely innefective. The very first day after we put up our alleged squirrel deterrents (the shiny spinners and the squirrel repellent) we saw one particularly slimy squirrel trouncing atop the fence with one of our pears in his mouth. In the days following we noticed more pears on the ground and fewer on the trees. At the time of this Episode the slimy squirrels are no longer stealing our pears, but that is only because they have already stolen all of the pears from our pear tree! From our bountiful crop we have consumed exactly ONE pear ourselves - the slimy squirrels got a few hundred. Here's hoping for another bumper crop next year, and more effective anti squirrel methods.
Phase Two, The Second
Our grand winter-spring-summer project is finished! You saw the completed Phase One, and now you will see the completed Phase Two. But first a quick review of our construction methods. Step 1 - dig out the trench. Step 2 - lay down some paver base. Step 3 - lay down some sand. Step 4 - lay down the pavers. Step 5 - apply the polymeric sand.
Step 1 - the trench has been dug. Notice how green the grass is and how small the raspberry bushs are. All the trenches for Phase One and Phase Two were dug at the same time.
Steps 2, 3, 4 - you can see some of the paver base, and the sand and pavers are partially laid. Paver base used for Phase Two - 48 bags. Sand used - 24.5 bags.
Step 5 - the polymeric sand has been applied. We're done with the project. Hooray! Note how dry the grass is and how much bigger the raspberry bushes are. Polymeric sand used - 1 bag.
Phase Two as seen from the yard.
As seen from the balcony.
This shows how all of the paver paths fit together in the back yard.
Our material staging area is mostly empty. We have leftover one bag of paver base and two and a half bags of polymeric sand. The polymeric sand spread a lot farther than our expected.
Turtle Update
We now bring you a turtle update. We have a new turtle planter in our pottery garden, and it is currently growing lettuce.
Unexpected Artifact
We close this Episode with a Back Yard Archaeology update. While churning the contents of the 'Mposter recently we discovered a mysterious unexpected artifact. We put up the 'Mposter, so there should be no pre-Bishopian artifacts inside, and it turns out that this is not a pre-Bishopian artifact.
But what is it, and how did it end up in the 'Mposter? After some serious study and prolonged research we know exactly what this mysterious artifact is, and we have a good idea of how it turned up in the 'Mposter.
Do you remember Clippy, our brand new Fiskars grass clipper from this Episode? Well, Clippy had been mysteriously missing for a few months, and we have already bought a replacement grass clipper because we gave up on finding Clippy. This artifact is Clippy! Clippy has been slowly composting for a few months - possibly since March, 2014! This was truly unexpected.
What likely happened is that when I was clipping some grass in the back yard, and putting the clippings in my green multipurpose tub, I may have absentmindedly tossed clippy into the tub along with the grass clippings. And when I emptied the tub into the 'Mposter there went Clippy. I have churned the 'Mposter several times since, but Clippy never showed up until just a few days ago.
As you can see, Clippy has degraded a bit, but at this point we don't believe Clippy is beyond rehabilitation. A little filing, a little sandpapering, some lubricating - Clippy might still have many useful years of usefulness.
Clip clip here, clip clip there...
bIsh
Monday, June 23, 2014
New House Blog: Episode LXXIII - Phase One
Phase one of our grand winter-spring project is complete. But since Phase One was completed yesterday, the first official day of Summer (and a certain brother's birthday) we have to call it our grand winter-spring-summer project. In this Episode we will talk all about the grand winter-spring-summer project, and we will introduce a new initiative we have initiated - Project G.R.O.S.S.S. Special thanks to Becky's awesome sister, Amy, for helping us with some heavy lifting recently that enabled us to complete Phase One in a timely manner.
Phase One: Part One
It all started with an idea - Becky and Bish thought it might be nice to have some brick walkways in the back yard, so they conferred and it was agreed upon to proceed with preliminary drawings and then to take measurements based on those drawings. After the measurements were measured, and estimated square footage was calculated, materials were ordered and/or picked up from Home Depot as needed.
The three pallets worth of brick pavers that we ordered from Home Depot. We ordered two different paver sizes and three different colors. You may remember the light fixture from this Episode.
Behind the pavers you can see some of the polymeric sand used for our project.
With pavers, drawings, and measurements we set about figuring out what kinds of patterns we might want to make from our pavers. Below you can see our preliminary test patterns.
Test pattern #1
N ot much to see here - no symmetry, no real order.
Test patterns #2, #3, and #4. There are three distinct patterns shown here. In the end we decided to us a combination of these three patterns and our own variations on same.
Phase One: Part Two
With materials, drawings, measurements, and patterns in hand we proceeded to the the laying out of our paver paths. We used twine, a right angle, and a yardstick to lay out our paths, then we started digging out the trenches for the base materials and pavers.
The two sizes of paver are 6"x6" and 6"x9", which heavily influenced our decision to make our paths 3 feet wide (3.65 metric feet (you remember the metric foot, or mfoot, don't you?)). A secondary influence was the fact that this would be sufficient width for operating the wheelbarrow we have on long-term loan from awesome brother Mike.
Digging is a long, laborious process, and it took us many digging sessions to fully excavate our paths. In this photo you can see some of the strings marking out the digging plan.
What to do with all of the excavated dirt? We spread most of it in the low area of the yard and raised it up quite a bit. We also made a small pile for any back-fill we might have to do.
The grass is still green in this photo. This was the final branch of Phase One.
This shot from the balcony shows the overall picture of Phase One. You can also see one of our paver stacks, and the pre-Bishopian artifact dug up in this Episode.
Project G.R.O.S.S.S.
Before we proceed to part three we are going to talk about our brand new initiative - Project G.R.O.S.S.S., or Project Get Rid Of Slimy SquirrelS. Yes, we know that squirrels are not slimy to the touch - what we mean is that the squirrels are slimy in the sense that they are slimy inside; they are slime-balls. Lately they have been raiding our pear tree and robbing us of its bountiful harvest. We have a lot of pears this year, but in the past week we have lost over 150 of them to the slimy squirrels. And the slimy squirrels aren't even eating the entire pear - they're just after the seeds in the middle, so they leave bits of pear all over and then leave the 1/2-eaten pears all over. We want our pears for our own consumption, and we don't like having to pick up all of the pear detrius, so we have initiated Project G.R.O.S.S.S. So far this involves strategically placing spinners and the use of squirrel repellent. We don't yet know how effective these measures will be.
Pear detrius. This is but a small sample of what we have had to pick up in the past few days.
Strategically placed spinners. Not seen are the four additional spinners in the crown of the tree and the one tied to the orange tree.
Phase One: Part Three
When we decided to put paver paths in our back yard we decided to do it mostly the right way. Instead of just digging our trenches and putting the pavers right down on the dirt we decided to put down paver base, then sand, then put the bricks on top of the sand. This is how the pros do it, and it's what we decided to do. We did not, however, use edge restraints or screed pipes.
Paver base, for those who might not know, is the foundation for paver paths. It is a semi-concrete type material made up of small rocks and sand-like materials. It is spread out in the trench, then wetted, then tamped down with a tamper. After setting it forms a rigid foundation that should prevent the pavers from sinking. For Phase One we used 54 bags of paver base.
We had to make multiple trips to Home Depot for paver base. This is a typical load in Becky's truck. Interestingly, and annoyingly, the first time I was at Home Depot looking for paver base, before I knew its proper name, I asked someone where I could find the paver base material. He had no idea what I was talking about. He called a second guy who thought I wanted some kind of plastic. They called a third guy who also thought I wanted plastic. I eventually found it on my own, in the garden section, and discovered that it is called paver base, and I was able to point it out to one of the guys I had talked to who had no clue what I was asking for.
This is a nice photo showing the various layers. Paver base on the bottom, sand in the middle, and bricks on top.
Here you can see the paver base installation progressing. It took us several sessions over several weeks to get all of the paver base laid and tamped down.
This photo shows all of the paths with paver base.
Phase One: Part Four
After paver base comes the sand and bricks. We layed down the sand and bricks at the same time. As mentioned previously, we did not use screed pipes. When laying down the bricks we decided that instead of making our paver paths perfectly level we would make them ground level. That is, instead of trying to figure out what would be level in our most-unlevel back yard we decided to have the paver paths follow the natural contours of the ground.
For Phase One we used 46.5 bags of sand - each bag weighing 60#. This is a typical load of sand in Becky's truck. On multiple occasions the Home Depot personnel were happy to assist us by using their forklift to hoist large loads of sand and paver base to Becky's truck, and then helping us load the truck.
This is our garage materials staging area. The configuration varied as the project progressed. Home Depot keeps sand in the building materials area, not in the garden area.
We started bricklaying from the garden border and worked toward the center path.
Getting this far took several sessions of bricklaying.
When the garden branch had reached the main path we started on the main path.
Note how dry and dead the grass is, in contrast to the green grass in previous photos.
While laying down the bricks we came upon this artifact, discussed in detail in this Episode. As you can see, it's right at the edge of the path. If it had been one inch farther over to the right we would never have found it, and it would still be buried today.
Hmmm... The lines looked straight when we dug the trench. Not sure what happened there.
Finally, the last branch of Phase One is bricked.
Phase One: Part Five
There were two more steps to complete after the bricklaying. The first step was to backfill around the edges with dirt from our dirt pile. The second, and final, step was to fill in the spaces between the pavers with polymeric sand. Polymeric sand is a special type of sand with added polymers that is used to fill in the gaps and crevices between pavers. After the polymeric sand is applied to the pavers water is applied gently to the polymeric sand. When it dries it forms a very tight bond between the pavers and acts like a glue to lock everything in place. For Phase One we used 1.5 bags of polymeric sand.
Here is Phase One completed, as seen from our balcony. Note the multitude of wheelbarrow tire tracks in the yard.
You can see some of the polymeric sand in this view.
Phase One as seen from the near The 'Mposter (our composter, for those who may have forgotten).
Phase One as seen from our food garden.
Having a Phase One would seem to indicate that there will be at least a Phase Two. Such is the case. Phase Two is already started, but I cannot talk about it here at this time.
Follow the yellow brick
bIsh
Phase One: Part One
It all started with an idea - Becky and Bish thought it might be nice to have some brick walkways in the back yard, so they conferred and it was agreed upon to proceed with preliminary drawings and then to take measurements based on those drawings. After the measurements were measured, and estimated square footage was calculated, materials were ordered and/or picked up from Home Depot as needed.
The three pallets worth of brick pavers that we ordered from Home Depot. We ordered two different paver sizes and three different colors. You may remember the light fixture from this Episode.
Behind the pavers you can see some of the polymeric sand used for our project.
With pavers, drawings, and measurements we set about figuring out what kinds of patterns we might want to make from our pavers. Below you can see our preliminary test patterns.
Test pattern #1
N ot much to see here - no symmetry, no real order.
Test patterns #2, #3, and #4. There are three distinct patterns shown here. In the end we decided to us a combination of these three patterns and our own variations on same.
Phase One: Part Two
With materials, drawings, measurements, and patterns in hand we proceeded to the the laying out of our paver paths. We used twine, a right angle, and a yardstick to lay out our paths, then we started digging out the trenches for the base materials and pavers.
The two sizes of paver are 6"x6" and 6"x9", which heavily influenced our decision to make our paths 3 feet wide (3.65 metric feet (you remember the metric foot, or mfoot, don't you?)). A secondary influence was the fact that this would be sufficient width for operating the wheelbarrow we have on long-term loan from awesome brother Mike.
Digging is a long, laborious process, and it took us many digging sessions to fully excavate our paths. In this photo you can see some of the strings marking out the digging plan.
What to do with all of the excavated dirt? We spread most of it in the low area of the yard and raised it up quite a bit. We also made a small pile for any back-fill we might have to do.
The grass is still green in this photo. This was the final branch of Phase One.
This shot from the balcony shows the overall picture of Phase One. You can also see one of our paver stacks, and the pre-Bishopian artifact dug up in this Episode.
Project G.R.O.S.S.S.
Before we proceed to part three we are going to talk about our brand new initiative - Project G.R.O.S.S.S., or Project Get Rid Of Slimy SquirrelS. Yes, we know that squirrels are not slimy to the touch - what we mean is that the squirrels are slimy in the sense that they are slimy inside; they are slime-balls. Lately they have been raiding our pear tree and robbing us of its bountiful harvest. We have a lot of pears this year, but in the past week we have lost over 150 of them to the slimy squirrels. And the slimy squirrels aren't even eating the entire pear - they're just after the seeds in the middle, so they leave bits of pear all over and then leave the 1/2-eaten pears all over. We want our pears for our own consumption, and we don't like having to pick up all of the pear detrius, so we have initiated Project G.R.O.S.S.S. So far this involves strategically placing spinners and the use of squirrel repellent. We don't yet know how effective these measures will be.
Pear detrius. This is but a small sample of what we have had to pick up in the past few days.
Strategically placed spinners. Not seen are the four additional spinners in the crown of the tree and the one tied to the orange tree.
Phase One: Part Three
When we decided to put paver paths in our back yard we decided to do it mostly the right way. Instead of just digging our trenches and putting the pavers right down on the dirt we decided to put down paver base, then sand, then put the bricks on top of the sand. This is how the pros do it, and it's what we decided to do. We did not, however, use edge restraints or screed pipes.
Paver base, for those who might not know, is the foundation for paver paths. It is a semi-concrete type material made up of small rocks and sand-like materials. It is spread out in the trench, then wetted, then tamped down with a tamper. After setting it forms a rigid foundation that should prevent the pavers from sinking. For Phase One we used 54 bags of paver base.
We had to make multiple trips to Home Depot for paver base. This is a typical load in Becky's truck. Interestingly, and annoyingly, the first time I was at Home Depot looking for paver base, before I knew its proper name, I asked someone where I could find the paver base material. He had no idea what I was talking about. He called a second guy who thought I wanted some kind of plastic. They called a third guy who also thought I wanted plastic. I eventually found it on my own, in the garden section, and discovered that it is called paver base, and I was able to point it out to one of the guys I had talked to who had no clue what I was asking for.
This is a nice photo showing the various layers. Paver base on the bottom, sand in the middle, and bricks on top.
Here you can see the paver base installation progressing. It took us several sessions over several weeks to get all of the paver base laid and tamped down.
This photo shows all of the paths with paver base.
Phase One: Part Four
After paver base comes the sand and bricks. We layed down the sand and bricks at the same time. As mentioned previously, we did not use screed pipes. When laying down the bricks we decided that instead of making our paver paths perfectly level we would make them ground level. That is, instead of trying to figure out what would be level in our most-unlevel back yard we decided to have the paver paths follow the natural contours of the ground.
For Phase One we used 46.5 bags of sand - each bag weighing 60#. This is a typical load of sand in Becky's truck. On multiple occasions the Home Depot personnel were happy to assist us by using their forklift to hoist large loads of sand and paver base to Becky's truck, and then helping us load the truck.
This is our garage materials staging area. The configuration varied as the project progressed. Home Depot keeps sand in the building materials area, not in the garden area.
We started bricklaying from the garden border and worked toward the center path.
Getting this far took several sessions of bricklaying.
When the garden branch had reached the main path we started on the main path.
Note how dry and dead the grass is, in contrast to the green grass in previous photos.
While laying down the bricks we came upon this artifact, discussed in detail in this Episode. As you can see, it's right at the edge of the path. If it had been one inch farther over to the right we would never have found it, and it would still be buried today.
Hmmm... The lines looked straight when we dug the trench. Not sure what happened there.
Finally, the last branch of Phase One is bricked.
Phase One: Part Five
There were two more steps to complete after the bricklaying. The first step was to backfill around the edges with dirt from our dirt pile. The second, and final, step was to fill in the spaces between the pavers with polymeric sand. Polymeric sand is a special type of sand with added polymers that is used to fill in the gaps and crevices between pavers. After the polymeric sand is applied to the pavers water is applied gently to the polymeric sand. When it dries it forms a very tight bond between the pavers and acts like a glue to lock everything in place. For Phase One we used 1.5 bags of polymeric sand.
Here is Phase One completed, as seen from our balcony. Note the multitude of wheelbarrow tire tracks in the yard.
You can see some of the polymeric sand in this view.
Phase One as seen from the near The 'Mposter (our composter, for those who may have forgotten).
Phase One as seen from our food garden.
Having a Phase One would seem to indicate that there will be at least a Phase Two. Such is the case. Phase Two is already started, but I cannot talk about it here at this time.
Follow the yellow brick
bIsh
Subscribe to:
Posts (Atom)