Saturday, November 15, 2014

New House Blog: Episode LXXVIII - Wired!

Our New House is finally wired.  To be a little more specific, our New House finally has a wired network in place so that we don't have rely solely on our wireless network for internet connectivity.  This upgrade has allowed us to finally take full advantage of the internet speed we are paying for, and we are enjoying the significant speed increase compared to our previous setup.  The wireless network will remain in place for use with mobile devices, but for our main computers, some printers, and our Roku, the wired network will provide the best connection.  Before we go into more detail about the network upgrade project we have a cat situation update.

Cat Situation Update

You may remember from the previous Episode that we were having trouble with one of our cats, Daisy, feeling the need to claim some territory in the cat closet. In addition to feeling overly territorial, Daisy was not moving much at all.  To illustrate this, on one occasion I carried her downstairs so that she would have to move to get food, since the food was all upstairs at the time.  She spent, as far as we can tell, almost 24 hours in one spot in my office downstairs without moving, until such time as the need for sustenance took over her territorial stubbornness and she went in search of food.  Lately she is doing much better and moving around a lot, and she doesn't seem to be claiming any more territory. She still doesn't like Edgar, and she hisses and growls whenever he is near, but her behavior is much improved.  In addition to calming spray pheromones and calming food we got Daisy some pheromone-laced calming collars, and we think the collars are having the biggest effect in modifying her behavior and attitude.

Speaking of modifying, we made a final alteration to the cat closet setup, as seen in this photo.

So far this new setup is working great.


Wired! 1 - Getting Started

Obviously, the first part of any big project should be some sort of planning, and plan we did.  We decided to run cable from our internet connection, near the TV in the orange room, to Bish's office and to Becky's office.  These are the two rooms that have stationary computers and printers that would benefit from being wired.  Bish's office would get four rj-45 jacks, and Becky's office would get two rj-45 jacks, for a total run of six cables.  After planning and gathering materials we got to work cutting holes in walls (s you may be aware, I am not averse to cutting holes in our sheetrock) for the j-boxes.

This is the j-box hole in Bish's office.
This is the j-box hole in Becky's office.
This is the j-box hole near the TV in the orange room.  As you can see there was a bit of unforseen challenge with this hole.  It seems that there is a layer of plywood behind the sheetrock in this location.
Looking into the hole in the orange room.  What's that nail doing there?
Looking through the hole in Bish's office you see one corner of the bathtub in the downstairs bathroom.
Looking through the hole in Becky's office you see another corner of the bathtub in the downstairs bathroom.

After cutting the holes in the sheetrock we had to drill a couple of holes through the subfloor for the cables to pass through.


Wired! 2 - Under The House

This was the part of the project that I was least looking forward to - crawling under the house and pulling cable.  This was due, in large part, to my never having been underneath our New House before.  I've been under a coulple of houses in my life, so I kind of knew what to expect, but there's always the unknown: are there big spiderwebs, or rats, or badgers?  Are any pipes leaking? Would I see fresh termite evidence, or ant activity?  Are there any ancient pre-Bishopian artifacts for me to find?  Knowing it had to be done, under the house I went (I was on my own here - Becky had/has no desire to visit the crawlspace). My first under-house trip was to scout out the territory, see what it was like down there, and figure out where the cables would actually need to go.

There was no evidence of animal activity under the house, but there was this odd spigot tapped into one of our water lines - an unused water line that leads to a spigot outside of our sliding glass door in the back yard.  The narrow plastic tubing does not go anywhere - it's just resting in the dirt under the house.  What is the purpose of this micro-spigot?  What were the pre-Bishopians thinking when they installed it?

There was no sign of any leaking pipes or dripping water, and no sign of ants or termites. In this photo you can see where the internet/tv cable is routed into the orange room.  Look at that lovely pre-Bishopian workmanship.

As you can see, in the daytime it's not very dark or scary under our New House, and it's dry and relatively clean. It's also quite dusty.  The pipes on the left are for the downstairs bathroom.


Wired! 3 - Under The House 2

The second excursion into the crawlspace was to do the actual cable run.  Before descending again we put pull cables through the holes in Bish's and Becky's offices, and we stuffed the bundles of cables through the hole in the orange room.

Looking back toward the orange room you can see the two cable bundles - four cables for Bish's office and two cables for Becky's office.
Look at those pretty cables.
Here you can see the pull cable descending from Bish's office.
And this must be the pull cable for Becky's office.


Cute Cat Interlude

How can we not have the occasional cute cat interlude when we have such cute cats?


Wired! 4 - Termination

With all of the cable pulled it was time to mount the j-boxes, terminate the cable ends, and install faceplates.

The faceplate in Bish's Office. Yes we are aware of the blatant runs in the paint in this photo.
The faceplate in Becky's office.


Wired! 5 - The End

All that remained was to connect everything.  Patchcords were made and plugged in, and it all worked right the first time.  Hooray!

This is everything connected up and the faceplate labeled.  The cable modem is the device at the top of the picture that you can only see part of.  On the right is the 8-port switch that connects everything together.  The lower white faceplate is where the internet/tv cable comes into the orange room.

Bonus Blooms

Today's bonus blooms are brought to you by our tiger jaws succulent.


Until we meet again,
     bIsh

Thursday, October 23, 2014

New House Blog: Episode LXXVII - The Three Seasons

October is in the air and the zig zag cactus are in bloom; and October brings with it the Three Seasons.

Season One is, of course, Hockey Season.  So far the Sharks are off to a good start.  Go Sharks!

Season Two is only slightly less well-known - Accursed Clover Season.  Yes, the accursed clovers, also known as Bermuda Buttercup or Buttercup Sorrel, have returned for another season.  This season, however, it seems that their numbers are way down compared to this time last year.  They are mostly showing up in the food garden and around our trees.  Only a few have dared to show themselves in the succulent garden.  This reduction in number is, we believe, due in large part to our continued vigilance in pulling them up by their roots.

Season Three is Fireplace Season, not to be confused with California's Fire Season.  Our wonderful fireplace is open for the season and we have had some fires already (after checking the spare the air website, of course).  We have a good supply of firewood available, and if there aren't too many spare the air days we plan to seriously reduce our stockpile of combustibles.

Cat Motivated Repairs

We have four, count 'em, four cats.  That's a lot of cats for two people, and this Episode will have a lot of cat pictures.  Most of the cats get along well with, or at least tolerate, each other most of the time.  One cat, however, was quite upset and decided that it was necessary to claim some territory.  I won't go into great detail here, but suffice it to say that we discovered said territorial claim when a certain smell began to saturate the air in our bedroom.  Our first suspect for the smell's source was the cat closet, where one of their litter boxes resides.  Close investigation of the cat closet confirmed that at least one of our cats was claiming territory in the back left corner of the cat closet.  We uncovered visual and tactile clues in addition to the olfactory clues.  By that I mean that the carpet in the claimed corner was quite damp and we could see fresh liquid on the baseboard. Additionally, the black light revealed more evidence of recent territory claiming.

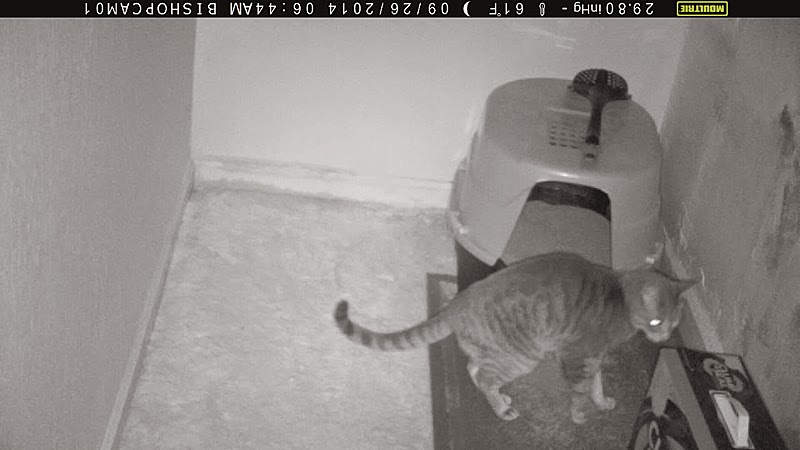
At this point we didn't know who was responsible, but it was pretty obvious that this behavior had been going on for at least a few days before we discovered it.  We liberally applied Arm & Hammer carpet cleaner to absorb liquid and stop its spread, then we set up a critter cam in the closet to discover which cat, or cats, was responsible for the mess.  We set the camera to take 20-second videos when motion was detected.  The black and white photos are stills pulled from some of these videos.  They are black and white because that's how the camera captures night and low-light footage.

Satchmo in the contamined zone.  He and Daisy were the only two visitors to the zone that we caught on camera.

We have our culprit!  Here you see Daisy just before she put an additional claim on this territory. I was not surprised that it was Daisy, because she is the cat that has been the most upset and disturbed since Edgar's arrival in our household several months ago.

Now that we had determined our culprit we could begin cleanup, repair, and cat behavior-modification.

The Cleanup

We headed to our local pet megastore and picked up the appropriate cleaning and calming chemicals.

Before cleaning we moved the camera to see if anyone else might be involved, but no one else went into the corner. This is Edgar just sniffing around.
This is Miles, also just sniffing around.  If you look closely you can see that the baseboard has absorbed some liquid near the corner.


The first step of the cleanup was to vacuum up all of the carpet cleaning powder and dispose of it.  After this came the pulling up of carpet and the removal of baseboard. Underneath the carpet we discovered that the carpet pad had been contaminated and some of the subfloor had soaked up some liquid. We also discovered that the sheetrock and some of the framing had absorbed some liquid. We treated the contaminated areas of subfloor and framing with the appropriate chemical and we disposed of the contaminated carpet pad.  We also thoroughly soaked the contaminated carpet area with the same appropriate chemical and provided a copious amount of raggy towels to absorb everything.

Finally, a color picture.
This is the corner with everything pulled up. You can see where we had to cut out the contaminated sections of sheetrock. The heater was used to help with drying everything out.

This is Miles roaming about the bedroom  while the cat closet is temporarily off-limits to cats.


The Repair

At this point we entered the repair stage.

Here you see the new sheetrock in place.
All taped up and ready for joint compound.
Fresh joint compound, with a fan to encourage drying.
Dried and sanded joint compound and new carpet pad. Home Depot only sells carpet pad in large rolls.  We only needed this small piece, but the smallest roll they would sell us was 6' x 8'.
The carpet is reattached to the tack board and new baseboard is in place.
The cat closet was finally painted.  Because this is a cat closet we didn't really care about precision or taping.  We wanted color and we got color.

From top to bottom we used Mermaid Harbor, Apple Harvest, and Autumn Glow.


Cat Behavior-Modification

With cleanup and repairs complete we entered the cat behavior-modification stage, a stage that will probably be ongoing for a while.

An initial step was to add a second litter box to the cat closet.  This will prevent cats from getting back into the corner, provide an additional place to do their business, and hopefully let Daisy know that she needs to do all of her marking inside the designated receptacles.  The new box on the left should also provided a little more privacy for the user.

For now we're keeping the critter cam active in the cat closet just in case we need to investigate any more inappropriate behavior.
This is Daisy checking out the new setup.
Edgar is also curious about the new setup.

Satchmo, being Satchmo, is even more curious about the new setup.

Sadly, we didn't capture any good footage of Miles investigating the new closet arrangements.  It seems that he may have been in and out of the closet so quickly that the motion sensor wasn't activated by his presence.  Or maybe he just didn't go very far into the closet when these videos were captured.

Additionally we are trying to give Daisy more attention, more playing, and we are using calming pheremonses - both spray and edible.  We may also try to keep Daisy and Edgar separate more often.  He tends to be rather rambunctious, and we think, at least in part, that several months of Edgar's pounciness and staring contributed to Daisy's anxiety and need to claim territory.  While repairs and cleanup were in progress we had Daisy in our bedroom alone at night, and she seemed much happier and cat-like when no other cats were around.  Hopefully we can find the right combinations of everything to keep all of our cats happy and well-adjusted.

Additonal Cat-related Pictures

Here you see our camera setup.  It is a Moultrie critter cam, hanging upside-down from a Joby Gorillapod flexible camera tripod.  When this whole thing is over and Daisy is calmed down I hope to use this camera outside to see what critters pass by our house (and occasionally leave gifts in the front yard) at night.
This is Miles and Edgar.

Cats love paper bags.


Bonus Pictures

You remember the blooming cactus mentioned at the beginning of this Episode?

This is one of our zig zag cactus.  We were pleasantly surprised to discover that they bloom in the fall - right now.
Happy cactus.


Does anyone need some carpet pad?
    bIsh

Monday, September 08, 2014

New House Blog: Episode LXXVI - The Hedgerow

We begin this Episode with a brief overview of our anti-wasp initiative (it doesn't have a fancy name like G.R.O.S.S.S).  We will then discuss our brand new hedgerow.  Finally, we will take you on a tour of our recently-unearthed pre-Bishopian artifacts.

Anti-wasp Initiative


We don't like having too many wasps, yellowjackets, or hornets around our New House, so we decided to take passive action against them.  We took action by hanging some traps, and then were passive as we let the traps do the work of trapping and killing the pesky pests.


Trap Number One is your basic plastic wasp trap.  The wasps are attracted by the attractant inside, they fly in, and they can't find their way back out.  After a while they die.  This trap has caught a lot of western yellowjackets.


Trap Number Two is a variation of Trap Number One. This one has an upper chamber, filled with one kind of attractant, and a lower chamber, which uses the same type of attractant as Trap Number One.  The two chambers are designed to attract different kinds of pests. So far we have caught nothing in the upper chamber, which tells me that we don't have the types of pests it is designed to attract.  The lower chamber, however, has caught a lot of western yellowjackets.


Trap Number Three is a completely different type.  It is made of blue glass.  The idea is that the pest bugs are attracted by a home-made attractant (recipes abound online), they fly in the hole in the bottom of the jar and can't find their way out again.  So far we have not caught anything with this trap. Possibly we have the wrong mixture, or possibly it's a bad location - or possibly both.  It's the best looking of the three, however.


The Hedgerow


As you recall from the previous Episode, we laid down some pavers in the front yard to create a retaining wall and border.  That project was, in fact, the first part of our hedgerow project.  The second part of our hedgerow project was the actual planting of the hedges.  We chose Petite Butterfly Sweetpea plants (Polygala Fruticosa 'Petite Butterfly) for our hedgerow because of our past experience with these plants: we have three in the succulent garden and they have thrived; they are drought-resistant when established; and we know they won't get supertall and completely block our view of the street and sidewalk - we want a low hedgerow, not a hedgewall.


The first step in planting was clearing the ground and making it somewhat level and even.


Look at that level, even ground.  The yardstick shows the scale of the project.  You can also see that we left a few poppies intact.

The second step was digging 15 holes for the 15 plants. There are no pictures of the empty holes.  Digging was hard in our clay-like dirt, except for holes #5 and #11, which were easy to dig.


Here are the 15 sweetpea plants in the garage, prior to planting.


Step three was the actual planting of our hedgerow sweetpeas.  They are spaced about two feet apart, and about 18 inches back from the brick border.


Step Four was the application of mulch.  Just look at all of that mulch in the garage.


Here you see the mulch after application. We chose red mulch because we like how the colors all work together and contrast nicely off one another.


BYA Update


This Back Yard Archaeology update showcases several pre-Bishopian and Old Ones artifacts that were uncovered during steps one and two of the hedgerow project.

This first artifact was found during step one - the smoothing and leveling of the ground.

As you can see, it is a bottle of brownish glass.  We can only guess what it once contained. It is similar in size to the bottle found in this Episode.


Possibly related to the bottle, but found several feet away and at a much deeper depth, is this aluminum can top.  It appears to be of an ancient pull-tab type.
The only marking on the can top is the word, "LUCKY," stamped into the thin metal. Could this once have been a can of Lucky Lager? Or was the can-maker named Lucky?
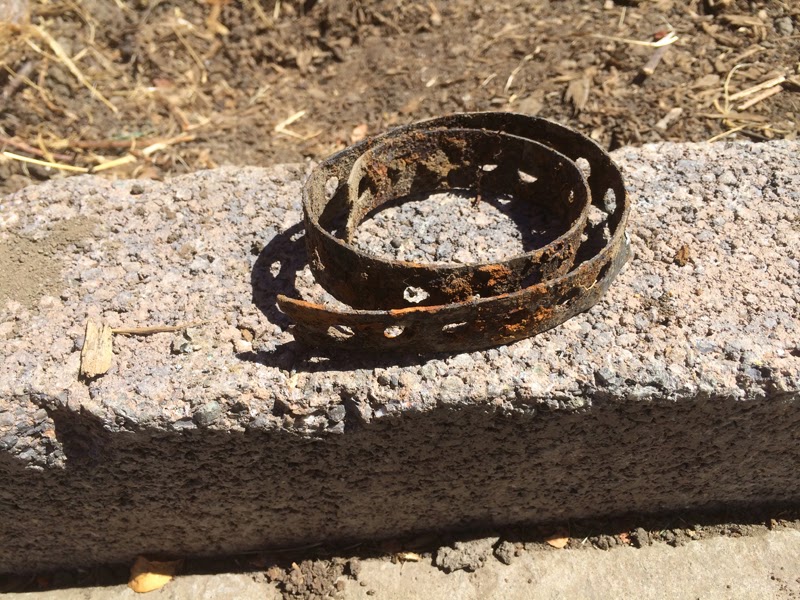
This coil of metal was an intriguing find. To most people it would appear to be a rusted length of metal strapping tape, but to the trained pre-Bishopian archaeological eye it appears that it might have been used as a rusted bracelet or anklet of some sort.  The pre-Bishopians seemed to be fascinated by rusted metal.


Artifact four is money.  One U.S. cent.  The date on the obverse is 1980.
There is no date on the reverse.


These next two artifacts we feel are from the Old Ones, those ancient and mysterious people who pre-date the pre-Bishopians.  The first is a seemingly-random slab of concrete, buried several inches deep in the ground.  
The second is also a seemingly-random slab of concrete, buried about a foot deep in the ground.  What were these concrete slabs originally part of?  How did they get buried so deeply?  

The Seventh Battle Of The Stump


We end this Episode with a stunning account of the Seventh Battle Of The Stump.  This stump was located at the corner of our front yard nearest the intersection of our driveway and the sidewalk.  It was in the way of our hedgerow project, and it had to come out.  


It doesn't look like much from this angle, but we couldn't see how extensive the root system was, or how tenaciously it was going to cling to the earth in a futile attempt to thwart us.  

As it turned out, there was not much underground, and there was no futile attempt to thwart us.  That is the stunning part of this Battle Of The Stump - the lack of resistance and the ease with which this battle was won.  In fact it was more of a friendly game than it was a battle. Longspade went into the ground and dug a little and the root came out very easily.  So now the record is Bishops 7, Stumps 0.


Happy Hedging to you all!
   bIsh